Saturday, April 2, 2011

101 things to make with burlap

Ok, so I have not made 101 different things, but I have made several! My blogging friend is having a fun linky party on burlap this weekend, so I thought I would put all my burlap creations together in 1 post! I have too many to choose from!! 

1. Pillows
 Owl Applique Pillow
 Flower and ruffle pillow

2. Home Accents:

 Place mats and table runners


 Cover step stool
  Table made from and old electrical spool
Owl 
 3. Holiday Decor

 Burlap Pumpkins

 Bunnies

 Stockings

 Tree Skirts

Burlap Angel
5. Re-usable Goods
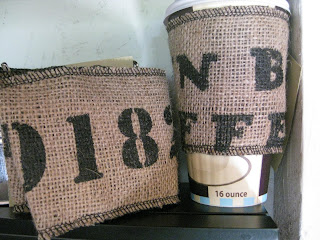
Coffee clutch
Tote Bags


 These are just a few of my burlap creations!! Many of my items are available on my ETSY shop too.
Now hope on over to FUNKY JUNK INTERIORS and check out even more made with burlap!!


Saturday, March 26, 2011

Do you Cricut or Silhouette?

I cricut but am drawn towards the silhouette. But I am way too invested in my cricut! I have the expression, 25 cartridges, design studio, and sure cuts a lot software. So to abandon my cricut is really not a justifiable option. I do wish there was a way to use the designs for silhouette with SCAL, so if anyone out there knows how to do that, i would love to know! I would also love to know any great places to find CUTE SVG images for SCAL. 

So since I have the cricut I thought I would show what I like to do with mine, other than the basics for scrapbooking. 

Now if you are a cricut user, you know the mats loose their tackiness pretty fast. Well all you need to fix that is some frog tape and Krylon Easy tack repositionable spray.
Tape off the edges of the cutting mat otherwise the wheels in the cricut will get sticky.
Take outside and spray a light coat and allow to dry 5 min. That is it! Now your mat will be nice and sticky! I do this especially when I am cutting out fabric, and yes you CAN cut fabric with your cricut. Here's how! 

You need a very sticky mat for this so it sticks well while cutting.
Iron heat n bond onto the wrong side of your fabric. 
Place fabric side on the cutting mat, so the paper back is facing up. 
Select your shape & size. Be sure the pressure is set to high, and it is best if you have a new blade, I keep one separate just for fabric cutting. You also want the speed to be on low. 
Cut your desired shape. 
Done! Now you can use then for applique, or what ever you want!!! Very simple to do! 
Last I am going to show you freezer paper stencils.
Cut your desired shape with your machine, using freezer paper, waxy side down. I used my SCAL for this design. Once you have it cut out you will need to place your pieces onto the fabric, this was a little tedious, but well worth it! The iron will melt the wax on the back side of the freezer paper so that it will stick to your fabric.
Once you have your design placed and ironed then you may apply your paint.
I use a dry brush and acrylic paint.
Once you apply all your paint remove the pieces with a tweezers and let dry. 


This is going to be a pillow, so I added some script with a stamp and staz on ink. 
Here is the finished project:

So do you cricut or do you silhouette? If you cricut with SCAL I would love to know any tips, tricks, and places to find good stuff!! 


Sunday, March 20, 2011

De-Cluttering the craft room!

Today I realized that I need to find some balance in my crafty life.
I take on a ton of projects and then never have time for my own "stuff". The last 2 times I went to a scrapbooking retreat I ended up sewing, so I have not scrapbooked for over a year and I really miss it. 
So I have decided to take on less and make some time for me. 
  The 1st thing I had to do was to re-organize this room! My sewing projects had taken over and I truly had stuff everywhere!! It was such a mess that when I sat down to start to scrapbook all I could think about was the mess in the room all around me. I can not relax in a messy room.
 So I cleaned and cleaned and finally my room is put back together.

 This cabinet holds all of my stamps, magazines, scrapbooking embellishments, ribbon, and misc stuff!

 Above it is all my paper, photos, misc sewing supplies, and my wall o punches!

 The fabric storage is put back together, I even have one cubby open!!

 Cricut and painting corner.
 And finally my work table, which I could easily transform back to sewing without it being a big transformation.


 Under cabinet storage, lots of sweaters, burlap and fabric.

Lots of 12 x 12 bins that work great to store many different items! 
So that's it, my room feels clean and organized so now I feel like I can finally sit down and get something done!!! If you could see my pile of photos you would know why I need to get back to it! 
And in April, when I go scrapbooking, that is exactly what I am going to do! 


Happy Spring?!?

Yesterday it was beautiful here, 40 degrees outside, snow was melting and I made a very exciting discovery.....

My spring bulbs were coming up!! Yeah!! 


Last year we planted over 100 new bulbs tulips and daffodils! 

So now that they are poking through the ground I need to protect them from the bunnies and deer! 

Soon they will be blooming, well that was my thought yesterday. 

Today we woke up to 2 fresh inches of snow.

These tulips are now not even visible! 

Happy 1st day of Spring!