Saturday, February 16, 2013

Pinned it, Made it, Loved it!

I love when a pinterest recipe turns out! 
Tonight I made Chocolate Molten Lava Cakes and they were so amazingly good! 
We had some a few years ago on vacation and I think these were even better, and very easy to make! 


Now if only there weren't 3 left upstairs... I hope the kids eat the rest before I do! 


Tuesday, January 22, 2013

All you need is LOVE

Valentines days is right around the corner! It's time to get out the decor! Pinterest is full of great valentine crafts! Here are a couple of items that I made tonight!


My favorites, burlap & wool sweaters! 
Happy crafting! 


Sunday, January 13, 2013

Bathroom Reveal-Major Transformation!

This is going to be a long post so please bear with me! Here are a couple teaser before and afters! 
I have wanted to update our old master bath for over a year now, and we finally did it! 
We knew it would be an expensive and time consuming project, but we finally dove in! 


Here are more before photos. I think I painted this bathroom back in 2001. I was so proud of the sponge technique. Not anymore! There were navy blue tiles around a sink that had a yellow glue seeping out from it all the time.
All the wood is a faux oak. The trim had an oak paper cover on it. 

 This was the part that I really hated, this amazing jacuzzi tub, with 2 large mirrors on each side. Are we still in the 70's??? This house was built in 2000 and they still do that!
 So lets get to work! 1st things first! Remove the mirrors and put in windows! A million times better already!
 Next was the nasty. leaky skylight. My hubby patched the hole and re painted the ceiling. You would never even know.
 Doors and trim-everything was painted white! I never thought they would look as good as they did. We did buy all new base board, but the trim and doors were updated with a little paint and new hardware.
Now for the good stuff! I am so excited about how this came together! 
 We did remove some of the cabinets but have plenty of storage in the closet in the bathroom and another one in the adjacent room.
 The vanity and counter top are new. We decided that the one we had just needed to be replaced. 

This chair was an old theater chair my dad came across for me. It was about to be thrown out! I will post later on how I re-did it. It was unfinished and painted black. 
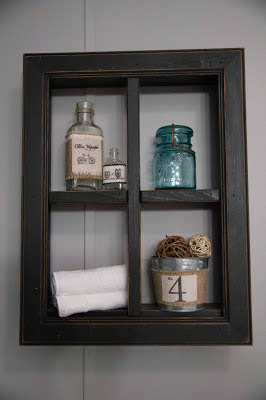
 The shelf and most everything on it & throughout the bathroom I already had. I love re purposing things from my home! I didn'y buy any of the decor other than the towles! 
I love ladders, and they work great for hanging towels! 
The flooring came together so well! It's a floating wood floor from Home Depot! I may be doing this in more rooms of the house! I love how it looks!
I made this using some linen, free word art and my ink jet printer! Placed in an inexpensive frame for some perfect bathroom art!
This was quite the project! I made the shower curtain from a combination of cotton fabric and sheets! I am glad I own a ruffler foot, there are 20 rows of ruffles here! I used grommets on the top for hanging, it is very heavy and I didn't want to to tear. 


 The curtains below were also made from sheets. I will be posting a tutorial later on how to make them!
My husband didn't want real candles in the birdcage so close to the ceiling, they would cause the ceiling to turn black. So I found some remote control LED candles at target! Genius!
After all that work, I am ready for some wine in here! 
 Thanks for sticking with me! Now if only I could fit my bed in here.


Thursday, January 3, 2013

DIY Ruffle Shower Curtain

Have you seen those all over ruffle shower curtains from Anthropologie?
They are beautiful! but come with a heafty price tag! $118 YIKES! 
We started a bathroom remodel recently and I loved this shower curtain, so I made my own!
It took a bit of hunting to find the 5 shades of grey (50 was too many) :) I ended up using a combination of cotton fabric and flat sheets! The curtain is 72" x 72". I cut 3-4 strips of each color approx 6" wide x 150" long, hemmed each one and then used my ruffler foot to ruffle all the rows! I started with the black at the bottom and then grey up to white!

Each row was pinned and sewn into place. The back is a white flat sheet that I cut and hemmed to make it the correct size! 
I first used a ruler and marking pen to draw on the lines so I knew where to place each ruffle. The top will have 12 grommets to hold it up as it is very heavy! This is all have to show you so far, but stay tuned for the finished bathroom, the before and afters are 
un-real!

Wednesday, January 2, 2013

DIY Charging Station

After Christmas I counted up all of our family gadgets! We have just a few. This kids were constantly stealing the charging cords so every time my husband and I went to plug in our phones, the cords had disappeared! I looked for something to hold everything and just could not find what I wanted. So I made one!
I found these great pieces from Micheals in the scrapbook room organization area. 
The top one is actually laying down. 


Take the drawer out, and the bottom (which will become the back) off. 
 You will need a 1" and 1 1/2" hole saw to make the holes for the cords.
 Drill all of your holes in both the top and bottom pieces. For the bottom drawer compartment, you will need to drill holes through the back of the drawer itself as well as the back of the entire unit. I drilled the holes in the drawer first and them marked the back piece so that they matched up perfectly!
You also need to add 1 1 1/2" hole in the bottom corner for the power cord to go through. Once the holes are drilled I simply screwed the back in place again.
The bottom drawer holds the power strip and all of the excess cord. We bought a new power strip that has USB ports built right into it! It also has a surge protector just in case!
Here is the back once it was all put together.
 And the front! It fit all the devices we had perfectly and the drawers work great for manuals, extra cords, etc!
 One thing I did notice was that when the devices came unplugged the cord may slip back, so I had these handy little holders I found on pinterest and bought a while back.

 The stick in place and hold the cords perfectly!

Now I still have my phone cord by my bed, and the kids always have a place to charge thier items!

Sunday, December 30, 2012

Make a Minky Infinity Scarf-a tutorial

Have you ever felt Minky?? It is quite possibly the softest fabric ever! Many people use it to make baby blankets. I decided to make something different with it, an infinity scarf! I bought 1/2 yard of each color which will make 2 scarves! 


 To start lay your fabric out and cut an 18" piece. This is really messy to work with so have a hand vacuum handy to clean up as you go! Minky comes 60" long. I leave it at that, it is the perfect length!
 Fold the strip in half lengthwise, right sides together.
 Pin along the open edge, I used several pins, the inside is lined with a silky fabric and it will move as you sew. I tried to pin every 3-4 inches.
 Now sew along the edge leaving about a 1/2" seam allowance. Thread color does not matter, you will not see it, minky is very forgiving!


 Now reach your hand in and turn the scarf inside out.

 You should now have a 9" wide tube!. I placed it flat on the counter and made sure that the seam was in the center.
 Now bring the two open ends together, tucking one inside the other. Pin the ends together & sew it!

That's it!! It will wrap around your neck 2 times and is so warm and cozy! Perfect for winter!
I also bought some skull and solid minky to make scarves for my boys! They love anything soft!

I simply cut one of each fabric 9" wide and sewed along both edges to make the tube. Turn inside out and finish the ends the same way! 

 The boys love them! They have had them on ever since I finished them!


Well there you go! Such a super easy project and it takes no more than 30 min to make!
Happy Sewing!