Sunday, January 9, 2011

Big Changes for 2011

I have been dying to clean and re-organize my closet, but I was waiting for 1 key thing, to hear on weather or not I was going to get the new job I had been interviewing for. I have a lot of "banker" clothes and knew that if I were to get this new job, I would need to "retire" several things in my wardrobe. Well I heard back this week, and YES I got a new job and could not be more excited!!! I will now be working for Maurices Corporate Office in the Visual Merchandising department. It will allow me to be creative at work, and I really feel like this could be the best job ever. I have never been this excited about a job ever in my life. So this weekend was time to re-organize some things around the house, starting with my clothes!!! 
 
 Here it is, and I had so much I was even invading the side behind the door! Now I know, and those of you that know me also know that since I am again working in retail, it will not take me long, to creep back over, but for now it is so much better!!

 After I tackled that one I was inspired to keep going, I don't know how all these hidden spaces get so messy! This is a drawer in my bathroom.

 It drove me nuts everyday this has all my makeup and things in there that I use everyday. I decided the drawer  needed dividers. I went out into the garage and cut some left over bead board. But 2 pieces 9 3/4, by 3 1/2. I also cut 4 pieces 4 x 3 1/2. Got out my trusty gorilla glue and glued it in place.

 I proped some books in the back to give it pressure while it dried.
And now things are much better! 
Just had to share!! I was inspired to organize from my pal Donna over at Funky Junk Interiors, she is having a party all about organization so if you need some great ideas stop by and visit her!! 


Saturday, January 8, 2011

Rag Quilt Part 3-In the home strech!!

Well today I finished the sewing portion of my quilt! Whew! The hardest part was making sure I kept the pieces in order!
 Once I finished making all the X's, I the pieces to make each row, and then sewed the rows together.
 This is the back side.

 Now for the part I have heard is the worst, clipping all of the seams! But I got the spring loaded scissors so it shouldnt be too bad, I hope!! This will be a "sitting and watching TV job" so I hope to have the finished product early next week to show. That will be after I take it to the laundry mat to wash it, I also heard, that is one thing you dont want to do at home!!
Happy Snipping!! 

To see the complete tutorial you can view step one HERE. and step 2 HERE.

Thursday, January 6, 2011

Raq Quilt Tutorial Part 2

Are you ready to start sewing?? Well it is time! 
Grab your 1st stacks, 1 f & 1 b.
 You want to place a piece of batting in between your pieces, wrong sides together, you will be sewing your X on the outside.
 want a little tip?? Get a walking foot. It makes this process go so much smoother.
 Now place your square under your walking foot and sew corner to corner to make an X. Do this for each set of squares for row 1. Make sure to keep them in the right order.

 Now you will take your 1st set of squares, and 2nd set, place them back to back and sew them together leaving an inch seam allowance. Add each set of squares all the way down until you have completed your 1st row. My thought is to complete all of your X's, then sew that row together, then you wont mix up any of your pieces.
 Here is the 1st row! Now time to finish the rest of my squares and rows, and can put it all together.
The last 2 steps will be clipping, and washing. Stay tuned!! 

Tuesday, January 4, 2011

Riley Blake Flannel Rag Quilt Tutorial Part 1

When I saw this adorable Riley Blake Fabric a couple of weeks ago out at Hannah Johnson's, I knew I had to make more than just my flannel pants out of it. I fell in love with the entire collection! So I decided to make a rag quilt from it. I have never made one before, but knew it wouldn't be too hard. I looked and looked for a good tutorial, but had some trouble finding one that really gave me all the directions. I am making an adult size quilt, many of the patterns are for children. So I am going to do my best to lay it all out for anyone else that would like to make one! 

My quilt will be 60 x 72 once it is finished. 
You will need 6 yards of flannel fabric for the entire quilt. I had 6 different fabrics. 
You will also need quilt batting, a full size roll should do.

Cut squares 7x7. You will need 240 squares of flannel, 120 for each side. You will also need 120 squares of batting cut to 6x6. 

Now once you get all of your squares and batting cut, it is time to lay it out and decide how you want it to look. 

 I played around a little with it so it was exactly how I wanted it. Once I laid out the front, I did the same for the back. I kept each row in it's own individual pile so once I begin sewing I will know what goes with what! This is where it could get confusing if you don't pay attention!
I labeled each pile with the row number and an f or b for Front and Back.
 Here is all my fabric ready to go. Tomorrow I will begin sewing. To start you take the 1st piece from row 1 front, the 1st piece from row 1 back, sandwich a piece of batting between the 2 wrong sides of fabric ( you will sew on the right side) and sew an X through the square. That will be 120 batting, flannel, X sandwiches! I will post more pictures tomorrow!! This was just to get you started!!

Stay tuned tomorrow for part 2!! 

Sunday, January 2, 2011

Fun Kitchen Accesories

So today I was working on some fun projects for my ETSY shop and came up with this cute little kitchen set. There is a ruffled towel, a set of 4 place mats, and a pot holder! Here is how I did it! 
 1st, the place mats, I used recycled coffee bean bags for the actual mat, and sergered the edge to keep it from fraying. I then used my cricut to cut my owls. You can cut fabric with your cricut by simply applying heat n bond to the back side, place fabric side down, and cut!! I hand cut the tree branch's and applied them with heat n bond as well! I glued on black buttons for the eyes.


Next up, the ruffled flour sack towel. Before I applied the ruffles I used my cricut again to cut my shape, but this time onto freezer paper. Iron the freezer paper to your fabric to use as a stencil. Paint your shape and let dry. The freezer paper will simply peel off. Once dry you can add your accents. Next I applied the ruffle. 


I cut 3 long strips of fabric and ran them through my machine using my ruffler foot. It makes the best ruffles!! I attached each one to the towel starting at the bottom. When I got to the top ruffle I applied a row of boas tape to finish off the edge. Above that I stitched on a row of pink ric rak. 
Lastly the HOT MITT! This is a oven mitt / hot pad. I began by making my own bias tape to finish the edge of the mitt. I used my bias tape maker by clover, slick little tool! The mitt has 2 layers of batting inside the main mitt, and  layer on the top that goes over your hand.
It is basically a hot pad with 2 pockets on the back. The entire mitt is quilted and has a ribbon loop to hang! 
Now your hand will be covered when you reach into the oven, no more burning your hand on the racks!! 

I used basic grey fabric for my entire project, I can not get enough of it!!! What fun additions for any kitchen!

Now I am participating in CRAFTING WITH THE STARS season 2, and I need your help!!! 

Between now and January 15, they will be accepting entires, and will choose the top 12 projects!  So if you like my stuff, please stop by sew dang cute and take a look!!! 

Thanks for stopping!
href="http://www.sewdangcute.blogspot.com">


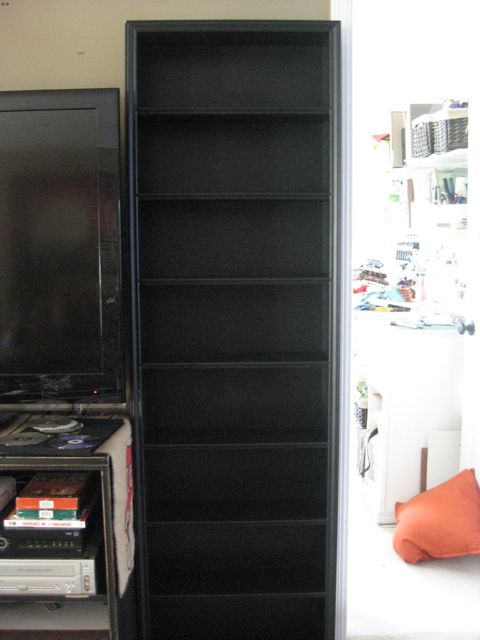
DIY DVD Bookcase

I have this problem, we have DVD's & Wii games here there and everywhere. There is no real good place for all of them. They never get put back in their cases and the kids have them every where! I looked online for a media cabinet and I could not find one I liked that would hold the amount of DVD's we have, and the ones that would work were over $300! In sticking to my word of the year, Simplify, rather than running around from store to store to buy something,  I got to work on a plan. 


I sketched a plan for the bookcase I wanted. My hubby looked it over and made his adjustments. 
He said that he would build it for me, he has some fun new tools that he wanted to try out! We had enough scrap wood in the garage to make it!!! Mike built the box and routered the sides for each shelf. They are 6 deep by 20 wide. 

 Then he added MDF to the back, some decorative trim to the front, and that is it!!! It is perfect

 We primed it and added 2 coats of black paint.


 We now have a complete library for our movies and games!!
 The kids think that since there is more room on the shelf, that we need to buy more games!

This shelf will hold over 200 movies and games, and cost less than $50!! 
Need for a media cabinet-SIMPLIFIED!!!! 

Saturday, January 1, 2011

Simplify

This is going to be my new motto for the upcoming year!! 

I am not making resolutions, they don't work for me.
But I am going to re-think some things I do throughout the year & simplify!

I have already started this past week while on vacation. 
Many rooms have been cleaned out. I still have some closets left to do. 
The storage room has been re-organized for much easier access.

I am going to USE the things I have been "collecting" in my craft room before going out and buying more.
I am going to keep my ETSY shop current and full, but thinking about the items I make and the "need/want" there is for them. Rather than making 10 of 1 thing because I like it, I am going to start with less and go from there. 
Before going out and buying things I want, I am going to see what I currently have that will work first, or can my hubby build whatever it is I have decided I need?? He is very handy! 
I am going to eat better and workout more. 
I am going to learn to SAVE. 
I am going to stop procrastinating. 


These are some of my goals for 2011, what are you planning to do? 
Do you make resolutions, do they work for you?