Sunday, March 25, 2012

Cute Outdoor Sign-HOW TO!

It seems I am starting to spend my Saturday's making something that I was inspired by on Pinterest. 
Here is another. I saw this sign little saying, and thought it would be perfect for my mom's greenhouse. 

So I cut 5 boards, each one was 12 inches long
Decided I wanted the letters white, so I gave it a couple of coats of spray paint, let dry!
 Once they were dry I brought them in and started cutting out my letters.
 I used my cricut, I selected several different fonts and sizes. I cut them out of white contact paper. 
 Once I had them all arranged I peeled off the back and stuck them in place. Make sure to stick them down very good. 
 I went back outside and sprayed over the boards, including the sides. I let this dry until it was tacky, and then carefully removed all of the letters. 
 I let that paint dry overnight, and then sanded the edges slightly. To put it all together, I cut 8 pieces of wire, and bent them into a U shape. I drilled small holes in the corners of the boards to put the wire through, and 2 larger holes at the top, I decided to hang it with rope. 
 Once the wire is though all the holes, I used a pliers to twist the wire down tightly against the board. Some I tapped down with a hammer so it didn't stick out too far. 
 To help feed the rope through I taped it off. It makes feeding the rope though much easier. 
 Then remove the tape, tie a knot and you are done!


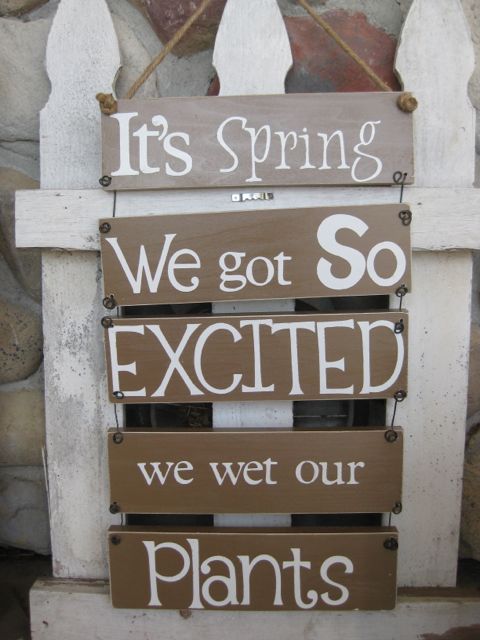
It is now ready to hang up! Her employees and customers will love it! 

Monday, March 19, 2012

Happy Spring!

 This past weekend was 74 in northern MN, I had spring fever, BAD! So now the inside and outside are all set. Bring on the warmer temps! I am ready! Are you all set for Spring? All the snowmen are tucked away until next season, and the bunnies are out! 
I got this little owl at Pier One last week.

I love this old window, and I love that I can simply change out what I hang from it every season. Right now it's just a simple egg wreath. 
Outside it was time to get out the patio furnature! Luckily my little men were all about helping mom. 
Here is my attempt at the terra cotta succulent wreath, I was not able to find all of the succulents I wanted, so we will see how ling this one lasts with what I had to use. Tuorial to come soon on this. I did pin it, but there were no instuctions! 


My perfect table, an old electrical spool, it is right next to my favorite bench. 
I wanted to make some new deocr, so I made this from a vintage strainer, moss, a real bird nest (left from last year!) and a stone bird that I painted off white. 
This is the most used space outside, we eat out here, sit and drink our morning coffee and just love to hang out! I do love my covered porch, I even love it on a rainy day! 
Now too bad I have to wait 2 month to add fresh flowers! 

Back inside.... Another bird, this one I painted apple green with Rustoleum 2 x coverage, it is only the best spray paint you can get! They have so many colors now!


 My other new Pier One bunny!
This little guy has been around for a few years, I am surprised that he has survived my little ones! 
Happy Spring! 

Wednesday, March 14, 2012

New twist on the mail sack

I have been loving the mail sack pattern I have been using lately! I wanted to add my own little twist to it though, so I did!
 I added a ruffle and a strip a fabric. This is such a fun versatile bag. I am so glad that I bought the pattern!
 and I also added LOTS of in side pockets to the purse! 4 interior and one with a zipper.


Then I made a matching wallet with 12 card holders and a zippered coin pocket on the back.
 Here is a cell phone holder that has a pocket on the front for debit card, lip gloss, etc! It was made using scrap of the purse and wallet fabric.

 Here they are the ruffled trio! The fabric is from Hannah Johnsons, here in Duluth MN. If you have not been there, you need to go! The best fabric in town!
Look for this trio soon in my etsy shop! 
Happy Wednesday! 

Monday, March 12, 2012

Jumpin In....

Well, I am going to do it. I am jumping in to pattern writing. I have been asked more times than I can count about the pattern for my Ruffled Purse. So I am finally going to attempt to write it. I have been working on it for a while now, doing research, creating the pattern, taking the photos and writing. 
 I took many photos along the way, that is one thing I always find helpful when following a pattern.
 So here I go, I putting it all together. Once it is done I will be looking for 2 people to "test" it for me before it goes live on my ETSY site for the world to see. So if you are a sewer and would like to be a tester for me, keep an eye on the blog over the new couple of weeks. I will hosting a little pattern tester giveaway soon!!
This is the finished product, let me know what you think. I would also like to know what is helpful in a pattern? What makes you want to buy a pattern? Thanks in advance for your help! 

Saturday, March 10, 2012

Shutter & Succulents

My hubby hung this shutter for me a while ago, and I knew it needed something in the basket, I just didn't know what. 
The shutter sat in a window for a long time, but now that I wanted it on a wall, it needed to be prepared! 

 We took one of the hinges off of the back and turned it the other direction, still holding the 2 pieces together, but now it won't open.
 Then simply added a wire for hanging but screwing it in on each end.
I added a wreath and cute little bird cage piece I picked up a Michael's 2 seasons ago. It still needed more...

 So I found some hooks that fit perfectly into the shutter and hung a long wire basket.

 But the basket was empty, what could I put inside it??? I have been pondering this for a while now, and then I decided that succulents would be perfect and add a nice spiring touch!
Aren't they cute! Picked them up at Home Depot. I love the different colors each one has!
Time to re-pot them! I had some old galvanized pails that I found at a garage sale in the summer, this is why I buy things that I know I will eventually use. 

I re-potted all 4 succulents into the larger tins. When you do this, be sure to add some rocks in the bottom for drainage! And do not put the dirt all the way to the top of the tin, leave a little room for when you water!


Now they are ready for the shutter basket!


This is the perfect addition to my shutter, now it looks complete!!


I think I have a bit of spring fever, it is 55 in Northern Minnesota today!! It was great to be able to replant these guys outside.